
外观
组件通信
简介
Vue3组件通信和Vue2的区别:
- 移出事件总线,使用
mitt代替。
vuex换成了pinia。- 把
.sync优化到了v-model里面了。 - 把
$listeners所有的东西,合并到$attrs中了。 $children被砍掉了。
常见传递形式:
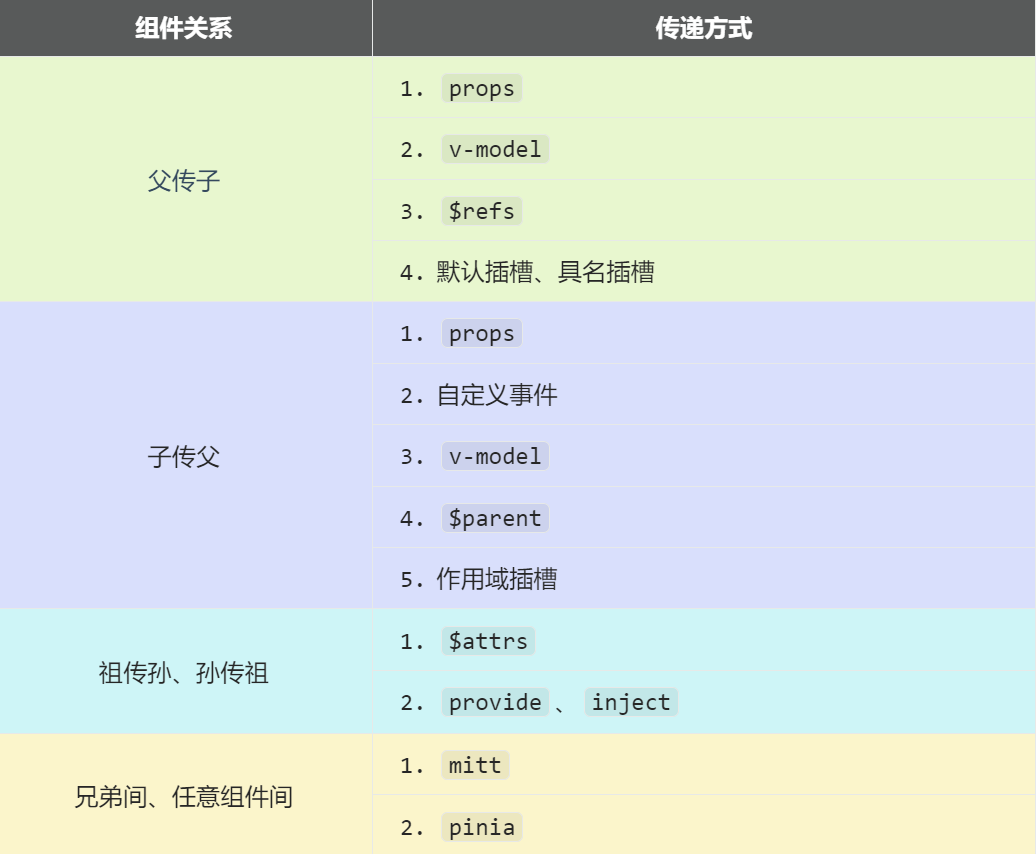
常见的方式
1、props
概述:props是使用频率最高的一种通信方式,常用与 :子 <=> 父
- 父传子:传递的是 数据。
- 子传父:传递的是 回调函数。
Parent.vue
<template>
  <div class="father">
    <h3>父组件,</h3>
    <h4>我的车:{{ car }}</h4>
    <h4>儿子给的玩具:{{ toy }}</h4>
    <Child :car="car" :getToy="getToy" />
  </div>
</template>

<script setup lang="ts" name="Father">
import Child from "./Child.vue";
import { ref } from "vue";
// 数据
const car = ref("奔驰");
const toy = ref();
// 方法
function getToy(value: string) {
  toy.value = value;
}
</script>
Child.vue
<template>
  <div class="child">
    <h3>子组件</h3>
    <h4>我的玩具:{{ toy }}</h4>
    <h4>父给我的车:{{ car }}</h4>
    <button @click="getToy(toy)">玩具给父亲</button>
  </div>
</template>

<script setup lang="ts" name="Child">
import { ref } from "vue";
const toy = ref("奥特曼");

defineProps(["car", "getToy"]);
</script>
2、自定义事件
- 概述:自定义事件常用于:子 => 父
- 注意区分好:原生事件、自定义事件。
原生事件:
- 事件名是特定的(
click、mosueenter等等) - 事件对象
$event: 是包含事件相关信息的对象(pageX、pageY、target、keyCode)
自定义事件:
- 事件名是任意名称
- 事件对象
$event: 是调用emit时所提供的数据,可以是任意类型!!!
Parent.vue
<template>
  <div class="father">
    <h3>父组件,</h3>
    <h4>我的车:{{ car }}</h4>
    <h4>儿子给的玩具:{{ toy }}</h4>
    <Child @handleUpdate="handleUpdate" />
  </div>
</template>

<script setup lang="ts">
import Child from "./Child.vue";
import { ref } from "vue";
// 数据
const car = ref("奔驰");
const toy = ref("");
function handleUpdate(data) {
  console.log(payload);
}
</script>
Child.vue
<template>
  <div class="child">
    <h3>子组件,</h3>
    <h4>我的玩具:{{ toy }}</h4>
    <button @click="sendData()">玩具给父亲</button>
  </div>
</template>

<script setup lang="ts">
import { ref } from "vue";
const emit = defineEmits(["update-data"]);
const toy = ref("奥特曼");

function sendData() {
  emit("update-data", toy);
}
</script>
3、mitt
概述:与消息订阅与发布(pubsub)功能类似,可以实现任意组件间通信。
安装mitt
npm i mitt初始化事件中心
新建文件:src\utils\emitter.ts
// 引入mitt
import mitt from "mitt";
// 创建emitter
const emitter = mitt();
// 清理事件
emitter.all.clear();
// 创建并暴露mitt
export default emitter;
绑定事件、销毁事件
在需要响应该事件的组件中:绑定事件 .on()、同时在销毁前解绑事件 .off():
import emitter from "@/utils/emitter";
import { onUnmounted } from "vue";

// 绑定事件
emitter.on("send-toy", (value) => {
  console.log("send-toy事件被触发", value);
});

onUnmounted(() => {
  // 解绑事件
  emitter.off("send-toy");
});
触发事件
提供数据的组件,在合适的时候使用 .emit() 触发事件
import emitter from "@/utils/emitter";

function sendToy() {
  // 触发事件
  emitter.emit("send-toy", data);
}
4、v-model
概述:实现 父 ↔ 子 之间相互通信。
3.4 版本之前
组件标签上的 v-model 相当于::moldeValue + update:modelValue 事件。
<my-component v-model="userName"></my-component>
<!-- v-model 的本质是下面的代码: -->
<my-component :modelValue="userName" @update:model-value="callbackFunct">
</my-component>
ParentComponent.vue
<template>
  <div class="parent">
    <h2>父组件</h2>
    <p>用户名: {{ username }}</p>
    <p>年龄: {{ age }}</p>
    <ChildComponent v-model:name="username" v-model:age="age" />
  </div>
</template>
<script setup lang="ts">
import { ref } from "vue";
import ChildComponent from "./ChildComponent.vue";

const username = ref("");
const age = ref(0);
</script>
ChildComponent.vue
<template>
  <div class="child">
    <h3>子组件</h3>
    <input
      type="text"
      :value="name"
      @input="onNameChange"
      placeholder="用户名"
    />
    <input
      type="number"
      :value="age"
      @input="onAgeChange"
      placeholder="输入年龄"
    />
  </div>
</template>
<script setup lang="ts">
defineProps<{
  name: string;
  age: number;
}>();

const emit = defineEmits<{
  (e: "update:name", value: string): void;
  (e: "update:age", value: number): void;
}>();

const handleNameChange = (e: Event) => {
  emit("update:name", (e.target as HTMLInputElement).value);
};

const handleAgeChange = (e: Event) => {
  emit("update:age", Number((e.target as HTMLInputElement).value));
};
</script>
3.4 版本之后
从 Vue 3.4 开始,推荐的实现方式是使用 defineModel() :
Parent.vue
<template>
  <UserName v-model:first-name="first" v-model:last-name="last" />
</template>
Child.vue
<script setup>
const firstName = defineModel("firstName");
const lastName = defineModel("lastName");
</script>

<template>
  <input type="text" v-model="firstName" />
  <input type="text" v-model="lastName" />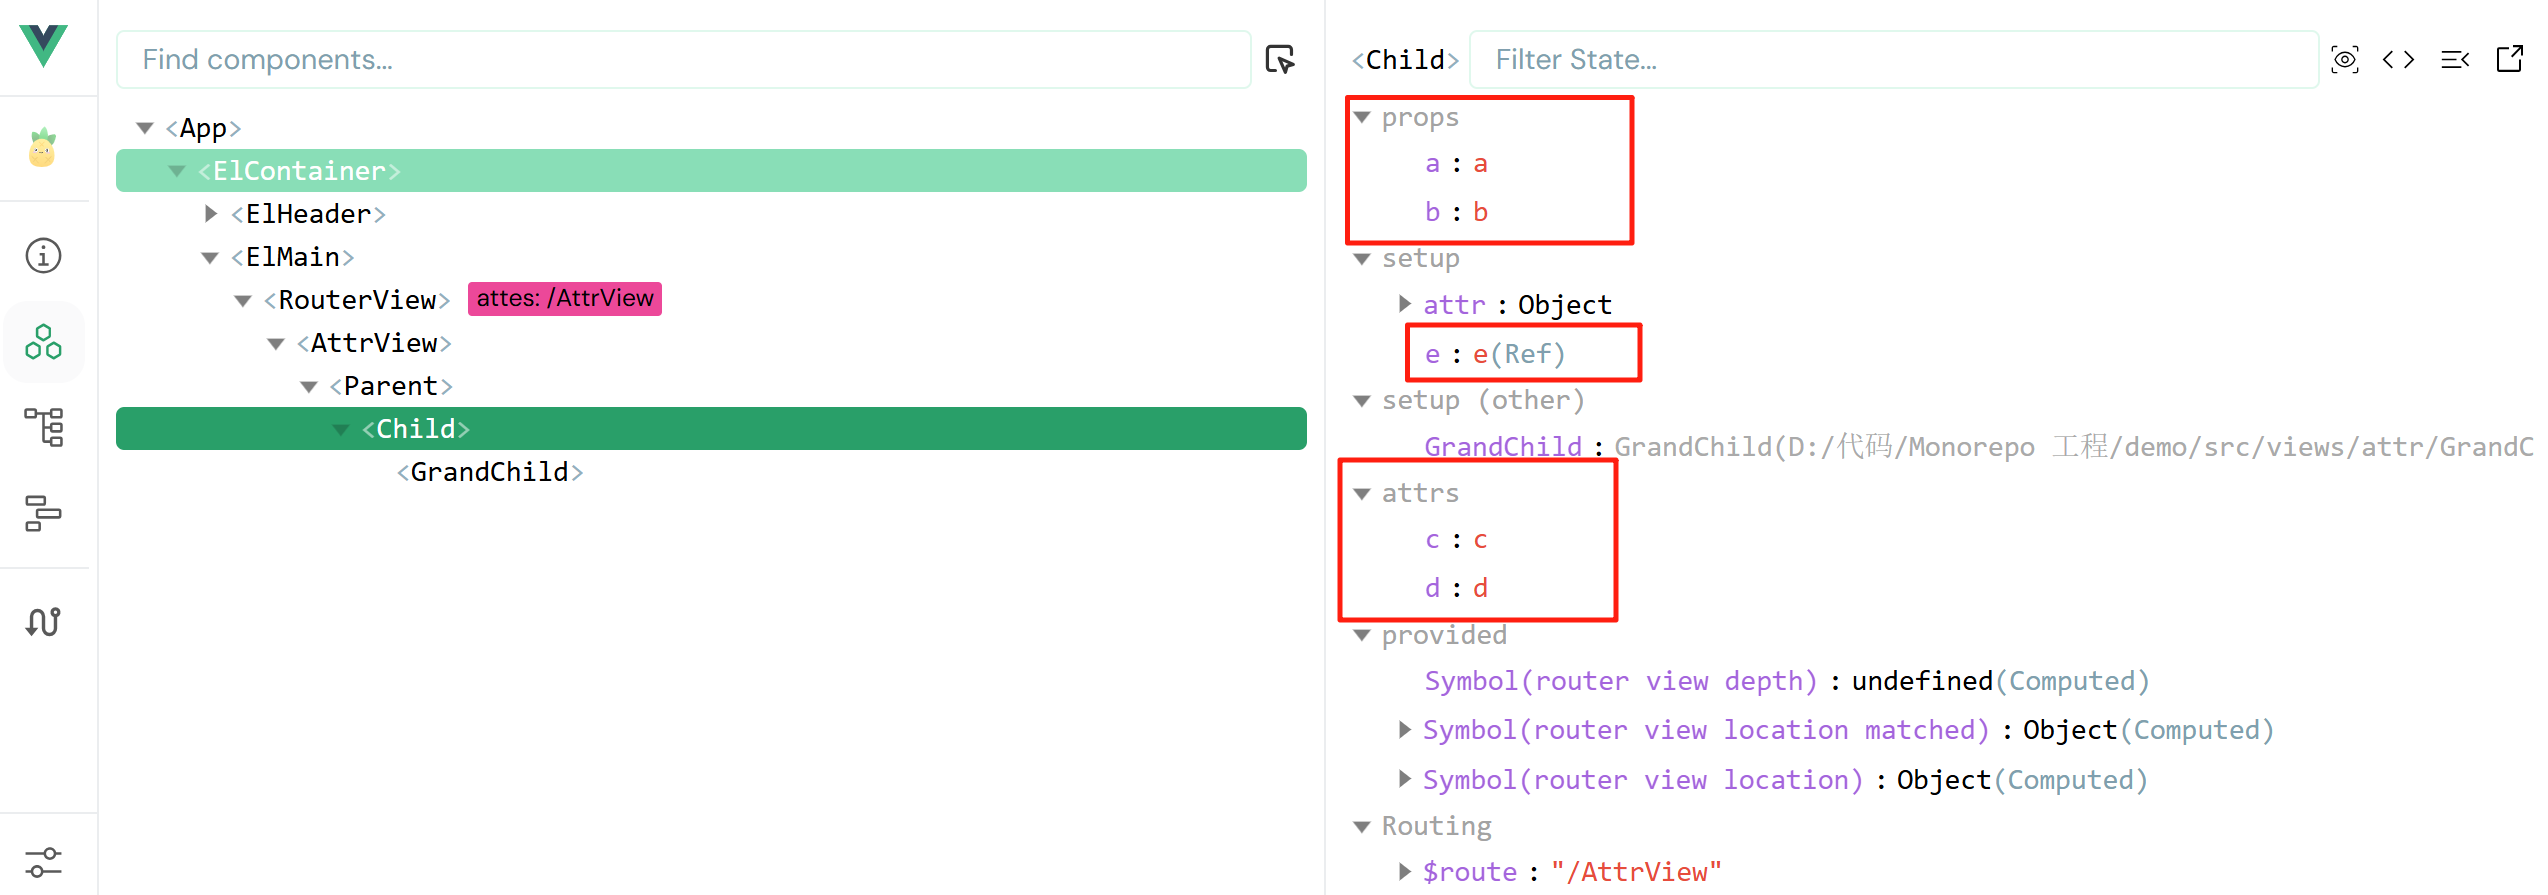
</template>5、$attrs
在 Vue 中,$attrs 是一个内置的组件属性,它包含了父组件传递给子组件的所有非 prop 属性(包括 Class、Style、原生 HTML 属性、自定义事件监听器等)。这些属性没有被子组件的 props 显式声明接收。
我们可以直接在子组件的模板上使用 $attrs 来获取或传递这些属性。
<div>{{ $attrs }}</div>
<child-component v-bind="$attrs"></child-component>
也可以在子组件的代码中使用 useAttrs 来获取:
<script lang="ts" setup>
import { useAttrs } from "vue";
const attr = useAttrs();
console.log(attr);
</script>
我们把 $attrs 比作遗产:
- 父亲给儿子在银行留了 A、B、C、D 四份遗产;
- 儿子把 A、B 取出来拿去创业了,C、D 没动,最后剩下 E 存进了银行;
- 此时,留给孙子的遗产就是 C、D、E,其中 C、D 来自父亲,E 来自儿子;
代码示例
AttrParent.vue
<template>
  <el-card class="parent">
    <div class="body">
      <el-text tag="b">父组件</el-text>
      <el-tag class="m_5">{{ a }}</el-tag>
      <el-tag class="m_5">{{ b }}</el-tag>
      <el-tag class="m_5">{{ c }}</el-tag>
      <el-tag class="m_5">{{ d }}</el-tag>
    </div>
    <Child :a="a" :b="b" :c="c" :d="d"></Child>
  </el-card>
</template>
<script setup lang="ts">
import { ref } from "vue";
import Child from "./AttrChild.vue";
defineOptions({
  // eslint-disable-next-line vue/multi-word-component-names
  name: "Parent",
});

const a = ref("a");
const b = ref("b");
const c = ref("c");
const d = ref("d");
</script>
<style lang="scss" scoped>
.parent {
  .body {
    display: flex;
    .list {
      display: flex;
      flex-direction: column;
    }
  }
}
</style>
AttrChild.vue
<template>
  <el-card class="child">
    <el-text tag="b">子组件</el-text>
    <div class="body">
      <div class="list">
        <el-text type="warning">props:</el-text>
        <el-tag class="m_5 min_0">{{ a }}</el-tag>
        <el-tag class="m_5 min_0">{{ b }}</el-tag>
        <br />
        <el-text type="warning">$attrs:</el-text>
        <el-tag class="m_5">{{ $attrs }}</el-tag>
      </div>
      <GrandChild :e="e" v-bind="$attrs"></GrandChild>
    </div>
  </el-card>
</template>
<script setup lang="ts">
import { ref, useAttrs } from "vue";
import GrandChild from "./AttrGrandChild.vue";
defineOptions({
  // eslint-disable-next-line vue/multi-word-component-names
  name: "Child",
});
defineProps(["a", "b"]);
const e = ref("e");
</script>
<style lang="scss" scoped>
.child {
  margin: 10px 0 0 0;
  flex: 1;
  .body {
    display: flex;
    flex-direction: column;
  }
}
</style>
AttrGrandChild.vue
<template>
  <el-card class="GrandChild">
    <el-text tag="b">孙组件</el-text>
    <br />
    <el-text type="warning">props:</el-text>
    <br />
    <el-text type="warning">$attrs:</el-text>
    <el-tag class="m_5">{{ $attrs }}</el-tag>
  </el-card>
</template>
<script setup lang="ts">
defineOptions({
  name: "GrandChild",
});
</script>
<style scoped>
.GrandChild {
  margin-top: 10px;
  padding: 10px;
  flex: 1;
}
</style>
效果
我们可以使用浏览器的 vue 提供的 devtool 查看:
6、$refs、$parent 不推荐
| 属性 | 方向 | 说明 |
|---|---|---|
$refs | 父 → 子 | 值为对象,包含所有被 ref 属性标识的 DOM 元素或组件实例。 |
$parent | 子 → 父 | 值为对象,当前组件的父组件实例对象。 |
建议
在组合式 API,也就是 setup 语法糖中,比较建议使用 defineExpose() ,来 选择性对外暴露数据,便于控制 $refs、$parent 获取数据的范围。
注意
在组件开发时,我们倾向保持数据的单向流动,所以我们推荐使用 v-model/自定义事件/provide/inject 来完成组件之间的数据传递。不推荐使用 $refs、$parent
效果
示例代码
上述效果的代码如下:
RefParent.vue
<template>
  <div class="RefParent">
    <el-card class="left flex_1" header="父组件">
      <div>父: {{ parentText }}</div>
      <div>子: {{ childVal }}</div>
      <el-button type="primary" class="btn" @click="viewChildRef" plain>
        获取子数据
      </el-button>
    </el-card>
    <RefChild ref="childRef"></RefChild>
  </div>
</template>
<script lang="ts" setup>
// 引入依赖
import { defineOptions, ref, useTemplateRef } from "vue";
import RefChild from "./RefChild.vue";
import { ElNotification } from "element-plus";
// 组件名称
defineOptions({ name: "RefParent" });
// 页面字段
let parentText = ref("父亲");
let childVal = ref("");

// 另外一种获取 $refs 的方式
// let childRef = useTemplateRef('childRef')
let childRef = ref();
function viewChildRef() {
  childVal.value = childRef.value.childText;
  childRef.value.sayHello("父组件");
}

// 对外暴露的 sayHello 方法
function sayHello(value) {
  ElNotification({
    title: "From 父组件",
    message: "调用方:" + value,
    type: "success",
  });
}
// 主动对外暴露
defineExpose({ parentText, sayHello });
</script>
<style lang="scss" scoped>
.RefParent {
  display: flex;
  flex-direction: row;
  .left {
    margin: 5px;
  }
}
.btn {
  margin-top: 10px;
}
@media (max-width: 500px) {
  .RefParent {
    flex-direction: column;
  }
}
</style>RefChild.vue
<template>
  <el-card class="RefChild" header="子组件">
    <div>子:{{ childText }}</div>
    <div>父:{{ parentVal }}</div>
    <el-button class="btn" type="primary" @click="getParent" plain>
      获取父数据
    </el-button>
  </el-card>
</template>
<script lang="ts" setup>
// 引入依赖
import { ElNotification } from "element-plus";
import { ref, defineExpose, getCurrentInstance } from "vue";

// 组件名称
defineOptions({ name: "RefChild" });

// 页面两个演示字段
const childText = ref("孩子");
const parentVal = ref("");

// 获取来自父组件的内容
const instance = getCurrentInstance(); // 当前组件实例
function getParent() {
  parentVal.value = instance?.parent?.exposed?.parentText.value;
  instance?.parent?.exposed?.sayHello("子组件");
}
// 对外暴露的 sayHello 方法
function sayHello(value) {
  ElNotification({
    title: "From 子组件",
    message: "调用方:" + value,
    type: "success",
  });
}
// 主动对外暴露
defineExpose({ childText, sayHello });
</script>
<style lang="scss" scoped>
.RefChild {
  flex: 1;
  margin: 5px;
  .btn {
    margin-top: 10px;
  }
}
</style>
7、provide、inject
实现 祖 => 孙 直接通信
- 在祖先组件中通过
provide配置向后代组件提供数据 - 在需要接收数据的后代组件中通过
inject配置来声明接收数据 - 其他层级的组件不需要任何处理
- 如果孙组件想往祖先传递数据,可以让祖先组件传递一个带参的回调函数。
案例
示例代码
以上效果的代码:
Parent.vue
<template>
  <div class="father">
    <el-card header="父组件" class="pCard">
      <el-text>资产:{{ money }}</el-text>
      <br />
      <el-text>汽车:{{ car }}</el-text>
      <br />
      <br />
      <el-button type="primary" @click="money += 1">资产 +1</el-button>
      <el-button type="primary" @click="car.price += 10">汽车价格 +10</el-button>
    </el-card>
    <Child />
  </div>
</template>

<script setup lang="ts" name="Father">
defineOptions({ name: "ParentView" });
import Child from "./InjectChild.vue";
import { ref, reactive, provide } from "vue";
// 数据
const money = ref(100);
const car = reactive({
  brand: "奔驰",
  price: 100,
});
// 用于更新money的方法
function updateMoney(value: number) {
  money.value += value;
}
// 提供数据
provide("moneyContext", { money, updateMoney });
provide("car", car);
</script>
<style lang="scss" scoped>
.father {
  display: flex;
  flex-wrap: wrap;
}
.pCard {
  flex: 1;
  min-width: 200px;
  margin: 5px;
}
</style>Child.vue
<template>
  <GrandChild></GrandChild>
</template>
<script setup lang="ts">
import GrandChild from "./InjectGrandChild.vue";
defineOptions({
  name: "ChildView",
});
</script>
GrandChild.vue
<template>
  <div class="grand-child">
    <el-card header="孙组件">
      <el-text>资产:{{ money }}</el-text>
      <br />
      <el-text>汽车:{{ car }}</el-text>
      <br />
      <br />
      <el-button type="primary" @click="updateMoney(5)">资产 +5</el-button>
    </el-card>
  </div>
</template>

<script setup lang="ts">
defineOptions({
  name: "GrandChild",
});
import { inject } from "vue";
// 注入数据
type injectType = {
  money: number;
  updateMoney: (x: number) => void;
};
const { money, updateMoney } = inject<injectType>("moneyContext", {
  money: 0,
  updateMoney: (x: number): void => {},
});
const car = inject("car");
</script>
<style scoped lang="scss">
.grand-child {
  flex: 1;
  min-width: 200px;
  margin: 5px;
}
</style>
更新日志
2025/9/27 17:16
查看所有更新日志
1eb9b-于